Update 29, November 2020 – There’s been a change in how PIA connects. Following the directions I wrote below will not work. Instead, follow the directions here with the following edits (from /u/cossadone on Reddit) to your openVPN config file of choice.
- Delete the “compress” line
- Delete the entire “<crl-verify>” section
- Add the line “comp-lzo no”
I recently signed-up for Private Internet Access‘ (PIA) VPN service. I do a lot of traveling and work in various places away from home. Having the extra – if not essential – security layer regarding my web traffic is something I’ve been wanting for a while now. The PIA iOS and Mac apps are easy to set up and use. Since I also use my Synology NAS to transfer content I wanted to figure out how to make that device also take advantage of my VPN account.
I found some directions for setting this up with the Synology DSM software version 6.1 and since I didn’t perceive much difference between 6.1 and 6.2 as a user I followed the directions. Except, things didn’t work!
Every time I went to connect the VPN connection in the Network control panel I was met with a connection error. I tried recreating the connection, resetting my password, and yes, even turning the NAS off and on again. Everything worked fine from my other devices, but the Synology would not successfully authenticate.
Here’s what worked.
First, download the files from PIA as described in the directions linked to before.
https://www.privateinternetaccess.com/openvpn/openvpn.zip
Unzip that file and keep the resulting folder handy.
Second, log-in to your Synology running 6.2. Open the Control Panel then select Network. From there, select the Network Interface option. You’ll want to click Create from the top menu and then Create VPN profile. Now this is where things diverge from existing directions. Select OpenVPN and click Next.
Now give the profile a name you’ll recognize. For the server address, remember that zip file you downloaded? In that file is a bunch of .ovpn files. These are OpenVPN configuration files. They are just text files. Select the file that matches the server location you wish to use. I chose one that is geographically near me. You may wish to select one that is geographically far. it doesn’t matter. 🙂 Open it in your favorite text editor. I used BBEdit.
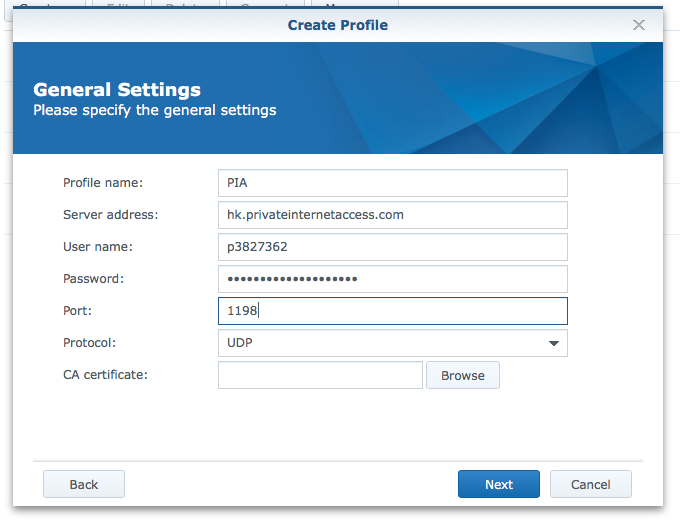
There are a few bits of information we want from the file. Look for the line that starts with remote and then an address and port.
remote hk.privateinternetaccess.com 1198

Return to your window with DSM open and enter the information into the Create profile window. Enter your PIA user name and password. Make sure you change the port to match what you found in the OpenVPN config. You should have something that looks like this.
For the last step on this window, you’ll want to select the CA certificate from the zip file. It’s the file that has a .crt extension. Then click Next.
Leave the Enable compression on the VPN link setting checked. Check the Use default gateway on remote network and Reconnect when the VPN connection is lost option. Then click Apply.
Now, select your newly created VPN interface and click Connect. Viola! Your Synology should now be connected to your VPN account.
One last thing. If you want all traffic to go through that connection (which you probably do!), click the Manage option in the Network Interface menu and select Service order. Put the VPN connection first. Then click OK. Return to the General tab in the Network control panel and set the default gateway to your VPN connection. Set the order here as well; VPN first.
Now, to test your connection! Visit https://ipleak.net in a new window/tab in your web browser. Navigate to the section that says Torrent Address detection. Activate that feature and then copy and paste the Magnet link into the DSM Download Station app. Start the download and wait for ipleak.net to refresh. Check the IP address. It should not match your local machine, but that of your VPN connection.
Two quick notes. There is no intelligent dead switch to stop transfers if your VPN connection goes down. My experience has been that it’s quite reliable. Your mileage may vary. In researching this topic I found comments related to the remote features of your Synology not working properly and requiring further configuration. I don’t frequently use my NAS off my local network so I have not bothered looking into this aspect. There are numerous guides online for both issues that may be helpful.
I hope this guide helps folks. Leave a comment if it helped, if made a mistake in my instructions, or if you have a better suggestion for setting this all up! Thanks for reading.